As the final step of your chocolate-making journey, you will learn how to mold your homemade chocolates. In this tutorial, Chef Prish explains how to make chocolate in molds, both filled and solid bars.
Now that we have learned the art of chocolate-making and chocolate tempering, it’s time to let our creative juices run wild by learning how to mold! Molding chocolate is so much fun, allowing us to make our own mark, sometimes quite literally with customized molds!
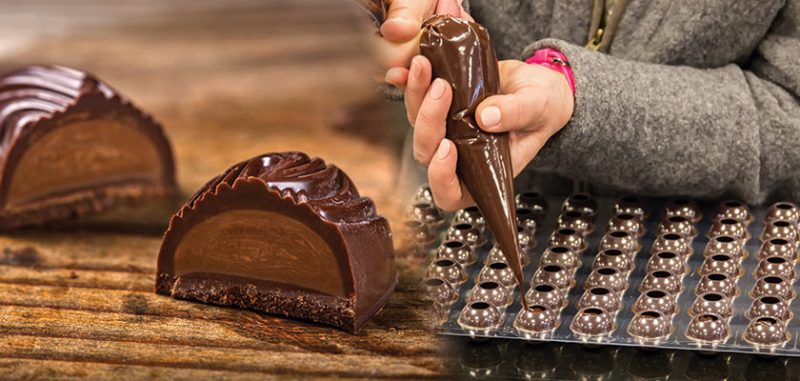
Molding chocolate means setting tempered chocolate in a mold until it hardens. At this stage, we can decide whether to make flat slabs, pralines, truffles, bonbons, gianduja, bark, or fruit and nut clusters. But, like the thoroughly prepared chocolate makers we are, first, let’s take a look at the array of molds out there and how to get our mise-en-place in order before we start molding.
The Different Types of Chocolate Molds
Molds come in all shapes and sizes and of different materials. Here is everything you need to know about them:
- Plastic: You can easily find plastic molds at your local baking supply store. They are cheap and easy for a few rounds of use, but won’t last long. If you’re a beginner, it’s a good place to start. Please note, they can easily crack.
- Silicone: Silicone molds are much more durable and can last a lifetime if treated with care. They are also easy to clean. They come in all shapes and sizes, so they have great versatility. The downside is that they are not rigid, so it’s not easy to tap or vibrate air bubbles out, and scraping excess chocolate off is also challenging because they are stretchy, not solid. They are affordable and fun to play around with, especially if you’re making chocolate bombs.
- Polycarbonate: These are made of food-grade plastic, incredibly durable, and therefore a good investment. They are made with multiple layers of plastic, melted at 500°F/ 260°C, then injected into a 2-part metal die where it forms its shape under high pressure. It’s virtually impossible to break a polycarbonate mold because of its high-pressure formation. All professional chocolate makers use polycarbonate molds. They give molded chocolate its gloss, unlike any other mold.
- Thermoformed: These molds are polycarbonate, but a single layer, not multiple, and because of this, they are much cheaper and less durable than injection-formed (above), so they are suitable for smaller batch production.
- Magnetic molds and cocoa butter transfer sheets: This method produces colorful patterns on the surface of the chocolate. The patterns, made entirely of cocoa butter, are painted onto “plastic transfer sheets” (acetate). The sheets are pressed, pattern-facing down onto the back of the chocolate mold (these molds are open at the front and back). Then, a magnetic plate is pressed against the transfer sheet, holding it firmly in place. Chocolate is poured into the mold. The warmth of the tempered chocolate gently melts the patterns onto its surface. The chocolates are then filled and set, the magnetic plate removed, and the transfer sheet gently pulled off, allowing the pattern to remain firmly embedded in the chocolate.
- 3D molds: Remember those Easter egg bunnies? How wonderful it was to poke your finger through its chocolatey shell to discover the toy hidden inside it. 3D molds are used to make those kinds of chocolates. They are two halves of a whole, and after both molds are filled, the halves are held together with magnetic clips allowing them to seal.
That was a birds-eye view of the fascinating world of chocolate molds. A little later we will explain how to use a chocolate mold. Now, we move on to mise-en-place, and finally onto how to make mold chocolate.

Prepare to Make Mold Chocolate: Mise en Place
- Set the room temperature to between 68°F – 69.8°F / 20°C – 21°C.
- Make sure the room’s humidity is not higher than 50%.
- Your workstation should be clean and tidy. Wipe the table with a fibreless cloth.
- Put some gloves on and wipe the molds down with a fibreless cloth. Make sure to get inside each one of the cavities to wipe down.
- Fingerprints show on the finished chocolate, so please avoid that by wearing gloves.
- It is also advisable to cover your hair in a hair net and put on an apron.
- Make sure you have a chocolate scraper, spatula, ladle, or piping bag ready to pour your tempered chocolate into the molds.
- Have a heat gun or hair dryer ready to warm up the molds. You have to get them to around 2 – 4 degrees lower than the tempered chocolate, so if your tempered chocolate is at 89.6°F/ 30°C – 32°C, then your molds should be warmed to 85.6 – 87.6°F/ 26 °C- 28°C. If you set tempered chocolate in cold molds, all kinds of catastrophes occur, like dull, flaky, or bloomed chocolate.
Most importantly, make sure your chocolate is in temper as you mold it.
If it gets too cold, it will fall out of temper, and you will have to re-temper it. To maintain temper, keep the chocolate in a chocolate warmer, or sous vide bath. These are better than a double boiler since they maintain a consistent temperature.
This is your tempered chocolate temperature guide:
- Dark: 89.6°F/ 30°C – 32°C
- Milk: 84.2°F/ 28°C – 29°C
- White: 82.4°F/ 27°C – 28°C
You can heat the molds using a hair dryer, heat gun or a slightly warm oven.
For full instructions on how to melt and how to temper chocolate for molds and enrobing, head over to our article on tempering here.
How to Make Chocolate in Molds: Shell & Filling
Here we explain how to use molds correctly, and how to make chocolate in molds with a shell and filling. If you are not planning on filling your chocolates then the process is much simpler, just skip to the section on How to Make Chocolate in Molds: Slabs, Bars & Blocks instead.
How to Make Chocolate Shells: Part 1
To make your chocolate shells:
- Heat the molds to the desired temperature.
- If you are using a mold with cavities, hold it at an angle, pointing down and away from you and back towards the warmer.
- Ladle, pour or pipe tempered chocolate into it, moving your ladle or spatula up and down like you would a paintbrush full of paint.
- If you are piping, run the bag seamlessly from bottom to top, to bottom to top, to bottom to top until you complete the whole mold.
- Once the cavities are full, hold the mold horizontally to the table, and tap against it with the back of your scraper a few times to release air bubbles.
- Next, angle it back down to the warmer and scrape the excess chocolate off the surface and sides neatly into the warmer without causing a mess or waste.
- Then, after a minute or two, turn the mold upside down over the warmer and let the chocolate from inside the cavities drip out. Tap with the back of your scraper as it drips out.
- While it’s upside down, scrape the excess chocolate off.
- Turn it over again and scrape down the surface and sides once again.
- Since the room is at 68°F – 69.8°F / 20°C – 21°C, you can leave the chocolate shell to set face-down on a piece of baking paper without refrigerating it.
- After a few minutes, turn the mold over and scrape the surface again. Hardened excess chocolate will come off, leaving super-sharp edges.
We set it face-down on baking paper to refine the edges as much as possible.
If the room is too hot, refrigerate it, face-down, for 5 minutes, at 57.2°F – 60.8°F/14°C – 16°C. Do not stack or cover molds in the fridge as moisture can drip from the top to the bottom. Remember to scrape the hardened excess chocolate off again.
How to Fill Chocolate Shells: Part 2
To fill your chocolate shells with your desired filling:
- Once your chocolate shells have set, pipe in your filling just below the mold edge.
- Tap the mold a few times on the counter to even out the filling and remove air bubbles.
- Leave the filling to set either on the counter or in the fridge.
- Finally, you can pour, pipe, or ladle the remaining layer of chocolate over, to seal the cavities.
- Scrape the excess chocolate off once again and clean up the sides as well. Leave to set.
- Once set, flip the mold over onto the counter. The chocolates should effortlessly fall out. If they don’t, tap the mold to help them fall out.
- Wrap the chocolates or box them immediately.
How to Make Chocolate in Molds: Slabs, Bars & Blocks
Learning how to make chocolate in molds as a solid bar or block is significantly easier than the shell and filling method. If you are molding a solid slab, bar or block of chocolate, or individual solid pieces of chocolate, then:
- Heat the mold to the desired temperature.
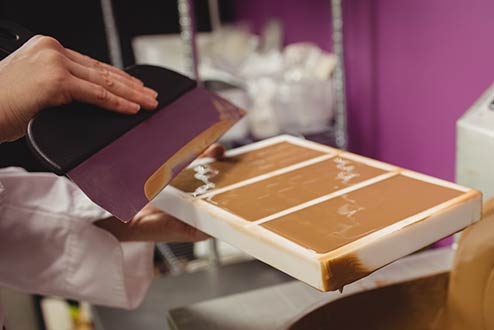
- Pour or pipe the chocolate into the mold and fill it to its edges.
- Scrape off the excess chocolate to flatten the slab and create clean edges.
- Hold the mold in one hand and tap it with the back of the scraper a few times to level it out and remove air bubbles.
- Set it on the counter or in the fridge with the same settings as above.
- Unmold it by flipping the mold over. The bar should fall to the counter.
- Wrap the chocolate immediately.
Decorate & Package Your Mold Chocolate
Now that you have learn how to make chocolate on molds, the final step is decorating and packaging it.
As you would have seen, chocolate design has become an art form. Abstract paint flicks, spray paint guns, intricate stencil work, gold and silver leaf, anything goes. There are many companies selling paints, powders, colored cocoa butter, and customized wrapping paper and boxes.
Tomric, the world’s market leader in chocolate mold and machinery has a fun array of accessories, paints, and boxes. You could even get some custom-designed ones. They also offer boxes for slabs.
You can also purchase foil wraps and wraps for chocolate bars and blocks. For tips on choosing and using foil wrappers for chocolate packaging, check out our guide to using foil wrappers by chocolatier Simon Knott.
Chocolate Mold CARE & MAINTENANCE
To continue practicing how to make chocolate in molds, since practice makes perfect, taking care of your molds is essential. To ensure the longevity of your chocolate molds, be sure to follow these maintenance tips:
- Take care of the molds – don’t wash them between rounds of molding – wipe them with a clean, cotton/ fibreless cloth.
- When washing, don’t use a scrubbing brush or anything abrasive, or it will scratch the mold and the surface of the chocolate will consequently have streaks and scratches.
- After washing them, dry them out in a dehydrator at a low temperature for an hour or two. Store them separately from your other tools in airtight containers.
- When cleaning, polish them with a 91% alcohol solution. Polish with cotton swabs and for corners use a Q tip.
Final Thoughts on How to Make Chocolate in Molds
We hope you’ve enjoyed this tutorial from Chef Prish on how to make chocolate in molds.
You can follow these steps for either homemade chocolate following these steps, or store bought chocolate. Homemade chocolate in molds can be easily decorated and make a lovely, personalized gift for any occasion.
To make the best mold chocolate possible, we strongly recommend you practice and familiarize yourself with how to make tempered chocolate in this article first. Once you’ve got the hang of that, you’re ready to start molding your own chocolate creations.
Happy Chocolatiering!


